HAPPY NEW YEARone and all!
2013 is now upon us and the festivities,
gastronomic glutony and over-spending
has all died down ... and we're back to
tightening our belts and settling back
into a routine with new aspirations and
goals to fulfill for the coming year!
(Well, that's the theoretic intention at least!)
![]()
So get your pliers out, plus a selection of
beads and 0.4mm wire and have a crack
at an old project of mine. It's a basic 'flower'
tiara decoration, which can be adapted with any
sized beads to be scaled up or down to
create earrings, necklace, bracelet, rings, etc...
Have a go at this:
'APPLE FLOWER' BRACELET
![]()
1.I threaded 6 x 4mm beads onto the end of some
0.5mm purple coloured spool of wire. (However, the
size of beads is your choice and 0.4mm silver-plated wire
works just as well!)
![]()
2. Bring the end of the wire around to create a beaded
circle, crossing the wires over where they meet.
![]()
3. Pull the end of the wire across the centreof the
beaded circle and and thread a further bead ontothe
end (to fill the central space).
![]()
4. Push the bead into the centre andsecure in place,
by threading the end of the wire over theouter circle
of beads. Pull both projecting ends tight in opposite
directions to form your very first 'Apple Flower'unit!
![]()
5. Cut the wire
fromthe spool,
leavinga tail of
about 4-5 cms ...
![]()
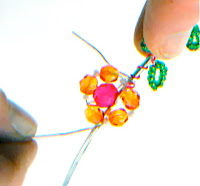
6. Use the tips
of your round nosed
pliers to create a
double wrapped
loop or link and
cut offany excess
wirewith your cutters.
Neaten the end.
![]()
7. Repeat, on the opposite side of the unit
tocreate another double wrapped loop.
![]()
8. To make a bracelet, create about 6 more Apple-Beads
followingsteps 1-7.
![]()
9. Connect
your Apple
Flower units
together
using jump
rings and
attach a clasp
at one end to
create a
necklaceor
bracelet chain.
![]()
Et voila! An APPLE FLOWER BRACELET!!
![]()
Or ... try making some EARRINGS following the
same tutorial.
![]()
... and what about
a matching ring?
Make it with 8mm
beads for an eye-
catching statement!
Or ... use more beads for a fancy decorative ring!
![]()
I used a similar technique for my 'Flower Power'
Choker in my 'Wire and Beaded Wedding'
book, pages 57-59 and wired the Apple Flowerunits
onto a choker frame ... see below ...
![]()
![]()
![]()
![]()
I HOPE THAT'S PROVIDED
YOU WITH SOME NEW YEAR
INSPIRATION!
... so get those beads rolling in
2013!!!
2013 is now upon us and the festivities,
gastronomic glutony and over-spending
has all died down ... and we're back to
tightening our belts and settling back
into a routine with new aspirations and
goals to fulfill for the coming year!
(Well, that's the theoretic intention at least!)

So get your pliers out, plus a selection of
beads and 0.4mm wire and have a crack
at an old project of mine. It's a basic 'flower'
tiara decoration, which can be adapted with any
sized beads to be scaled up or down to
create earrings, necklace, bracelet, rings, etc...
Have a go at this:
'APPLE FLOWER' BRACELET

1.I threaded 6 x 4mm beads onto the end of some
0.5mm purple coloured spool of wire. (However, the
size of beads is your choice and 0.4mm silver-plated wire
works just as well!)

2. Bring the end of the wire around to create a beaded
circle, crossing the wires over where they meet.

3. Pull the end of the wire across the centreof the
beaded circle and and thread a further bead ontothe
end (to fill the central space).

4. Push the bead into the centre andsecure in place,
by threading the end of the wire over theouter circle
of beads. Pull both projecting ends tight in opposite
directions to form your very first 'Apple Flower'unit!

5. Cut the wire
fromthe spool,
leavinga tail of
about 4-5 cms ...

6. Use the tips
of your round nosed
pliers to create a
double wrapped
loop or link and
cut offany excess
wirewith your cutters.
Neaten the end.

7. Repeat, on the opposite side of the unit
tocreate another double wrapped loop.

8. To make a bracelet, create about 6 more Apple-Beads
followingsteps 1-7.

9. Connect
your Apple
Flower units
together
using jump
rings and
attach a clasp
at one end to
create a
necklaceor
bracelet chain.

Et voila! An APPLE FLOWER BRACELET!!

Or ... try making some EARRINGS following the
same tutorial.

... and what about
a matching ring?
Make it with 8mm
beads for an eye-
catching statement!
Or ... use more beads for a fancy decorative ring!

I used a similar technique for my 'Flower Power'
Choker in my 'Wire and Beaded Wedding'
book, pages 57-59 and wired the Apple Flowerunits
onto a choker frame ... see below ...


I HOPE THAT'S PROVIDED
YOU WITH SOME NEW YEAR
INSPIRATION!
... so get those beads rolling in
2013!!!